
Using MoviePlayer, you can move and resize visible tracks within the movie window.
Here we'll show you how to use this feature, as well as QuickTime's transparency
capabilities to add a small graphic logo to your movie.
- Create a small graphic which will be your logo, using any graphic editor (Photoshop,
ClarisWorks, whatever). Leave what you want transparent white.
- Select your logo (using Select All or a selection tool) and copy it (Copy from
the Edit menu).
- In MoviePlayer, open the movie to which you'd like to add your logo.
- Choose Select All from the Edit menu so that the entire playbar becomes black,
then hold down the command and option keys, and select Add Scaled from the Edit menu.
(For more info on Add Scaled, see our how-to on 12/9.)
You have just added a video track containing the graphic to your movie; since you
selected the entire movie, the graphic was pasted in for the duration of the movie.
- Choose Get Info from the Movie menu, and in the Get Info window select Video
Track 2 in the left pop-up and Size in the right pop-up. (Video Track 2 should be
the track containing the logo graphic. However, if the movie you started with has
more than one video track, then the graphic may be in a track with a higher number
than 2; you should choose the highest numbered video track.)
- Click Adjust. In the movie window, the graphic will appear with a red border.
- Click in the middle of the graphic and drag to whereever in the movie window
you'd like the logo to appear (probably the lower right corner). If you want to resize
the graphic, you can also click on any of the corners and drag in or out to shrink
or stretch the graphic. (However, it's best to start with a correctly sized graphic
before you add it to the movie.)
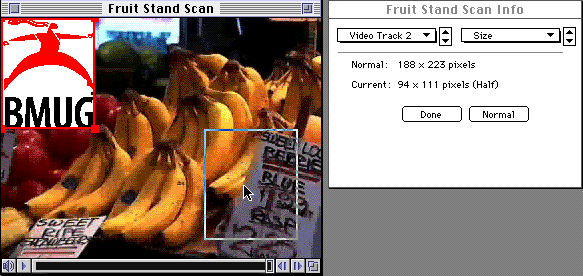
- Click Done.
You've added the logo. Let's give it a transparent background:
- From the right pop-up in the info window, choose Graphics Mode.
- In the list that appears, click on transparent.
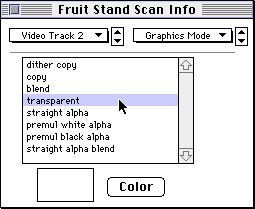
- Click on the Color button.
- In the resulting dialog, move the slider under the color wheel all the way to
the right. (The value for Lightness will become 100.)
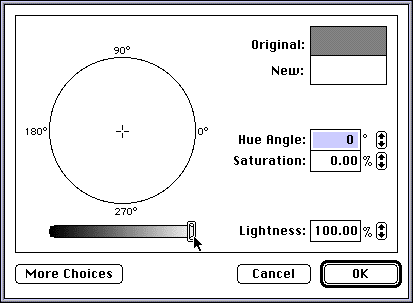
- You have just designated pure white as the color to be transparent.
- Click OK.
Now you should have a movie with a logo with a transparent background.
RETURN TO HOW-TO INDEX
RETURN TO MONTH INDEX
RETURN TO ARCHIVE INDEX
http://www.bmug.org/quicktime
copyright 1996-97  Judith L. Stern and Robert Lettieri, jandr@ccnet.com
QuickTime, the QuickTime logo, and Macintosh are registered trademarks of Apple Computer Inc